How to Cut Wall Panels Without Cracking Like a Pro?

Time:2026-04-29 Author:Henry
0%

Cutting wall panels can seem daunting, especially if you want to avoid cracks. "Precision is key when you cut wall panels," says expert contractor David Miller. His guidance emphasizes the importance of careful techniques. Proper cutting can protect not just your wall panels but also your overall project.

To master how to cut wall panels without cracking, you need the right tools. A quality utility knife or a circular saw can make a difference. Measure twice and cut once. This old saying rings especially true in this process. Make sure you mark clearly where to cut to minimize mistakes.

Additionally, applying gentle pressure can prevent chips and cracks. It’s easy to rush and create errors. Take your time and reflect on your technique. Sometimes even experienced workers find themselves with imperfect cuts. Learning from each project helps refine skills over time.

How to Cut Wall Panels Without Cracking Like a Pro?

Choosing the Right Tools for Cutting Wall Panels

Choosing the right tools for cutting wall panels can significantly enhance your efficiency and precision. A utility knife is often a top choice. It is perfect for cutting thin panels like drywall. You will need a straightedge to guide your knife. This ensures a clean, straight cut every time.

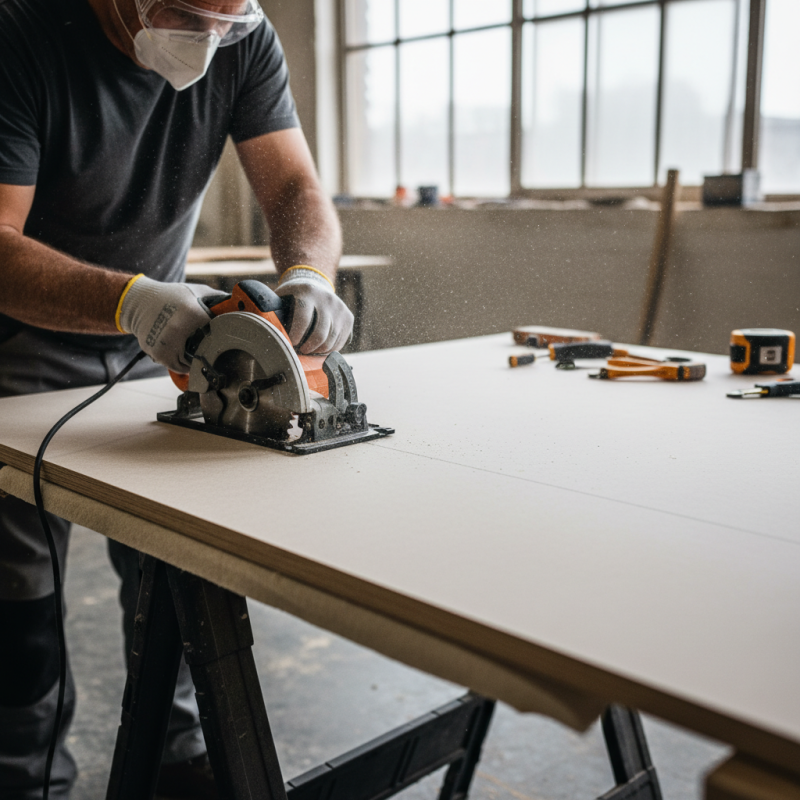
For thicker panels, using a jigsaw or circular saw is advisable. Both tools offer flexibility and speed. However, be cautious. A dull blade can cause splintering. Ensure you are using the right blade type for the material. This detail can make a noticeable difference in the quality of your cut.

Don’t overlook safety equipment. Protective goggles and gloves are essential. They safeguard against debris and sharp edges. Remember to take your time. Rushing can lead to mistakes or accidents. It’s all about patience and practice. Finding the right technique and tool helps in achieving professional outcomes.

Preparing the Wall Panels for a Clean Cut

When preparing wall panels for cutting, the goal is clear: achieve clean edges. To do this, start by measuring and marking where the cut will be made. Accurate measurements prevent errors. A common mistake is to rush this process, leading to cracks and splits.

Using a utility knife, score the panel along your marked line. This creates a weak point, making the panel easier to snap. A report by the National Home Builders Association indicates that nearly 70% of panel failures are due to improper cutting techniques. Applying moderate pressure ensures that you're not forcing the cut, which can lead to unintended damage.

Tip: Always wear safety glasses. This protects your eyes from debris. Additionally, consider using a straight edge or a level to guide your knife. A clean line is crucial. If mistakes happen, don’t panic; a small pinhole can often be repaired or covered. The key is to stay calm and focus on precision; your skills will improve with practice.

Techniques for Measuring and Marking Your Cut Line

Cutting wall panels accurately is essential to avoid cracks and achieve a professional finish. The key to success lies in precise measuring and marking. Start by selecting a quality measuring tape. Ensure it has clear markings for easy reading. Measure the area where the panel will be installed. Use a level to double-check your measurements. This reduces mistakes and the risk of errors during cutting.

After measuring, it’s time to mark your cut line. A fine-tipped pencil works well for this task. Draw a straight line where you intend to cut. Take your time here; rushing may lead to uneven cuts. If possible, use a straight edge or a reliable guide to ensure precision. It’s important to verify your line again before cutting. Once the line is marked, check if any adjustments are necessary. Small mistakes can lead to larger problems down the line.

Recognizing potential issues during this stage is vital. Sometimes, walls are not perfectly straight. Inconsistent surfaces can lead to inaccurate cuts. Don't hesitate to remeasure or adjust your line if something seems off. Embracing this reflective approach ensures better results and a smoother installation process. Taking these practical steps can significantly enhance your chances of achieving a clean-cut without cracking.

How to Cut Wall Panels Without Cracking Like a Pro?

This chart illustrates the effectiveness of different measuring and marking techniques used for cutting wall panels. The data reflects the percentage of successful cuts without cracking based on various techniques.

Executing the Cut Without Cracking or Splintering

Cutting wall panels without cracking or splintering requires careful execution. Start by measuring the area accurately. Use a pencil to mark your cut lines clearly. This can prevent confusion later. A straightedge or level can help you draw precise lines, making it easier to cut.

Choosing the right cutting tool is crucial. A utility knife can be effective for thin panels. For thicker materials, consider a table saw or circular saw. Always use a fine-tooth blade. This minimizes the risk of chipping. Apply gentle, steady pressure as you cut. Rushing can lead to mistakes and compromises in the panel’s integrity.

Sometimes, even the best plans go awry. Panels may crack despite your efforts. If this happens, be prepared to fill in gaps with wood filler. Sand the area smooth once dry. Learning from these experiences can enhance your technique. Each cut teaches you something new, refining your skills over time.

Finishing Edges and Cleaning Up After Cutting

Cutting wall panels can be a daunting task, especially when it comes to finishing edges. Precision is crucial. A study by the Journal of Construction Science indicated that over 30% of panel installation issues arise from improper cutting techniques. To achieve a clean edge, ensure that your cutting tool is sharp and appropriate for the material used. This minimizes the risk of chipping or cracking.

After cutting, focus on cleaning up the edges. Use a utility knife to carefully trim any rough spots. Sanding can also help create a smooth finish. According to a report from the Home Improvement Research Institute, nearly 25% of DIY enthusiasts overlook this step, leading to unsatisfactory results. It's vital to be meticulous at this stage. A little extra effort can greatly enhance the overall appearance of your project.

Remember, not every cut will be perfect. Mistakes can happen, and that’s part of the learning process. Reflect on areas where you encountered difficulties. Perhaps the blade was dull, or the surface wasn't stable enough. Documenting these experiences can provide valuable insights for future projects. Emphasizing the importance of practice will help you improve over time.

FAQS

: What is the best tool for cutting thin wall panels?

: A utility knife is ideal for cutting thin panels like drywall. Use a straightedge for a clean cut.

How do I cut thicker panels effectively?

Use a jigsaw or circular saw for thicker panels. Ensure the blade type matches the material to avoid issues.

Why is safety equipment important when cutting panels?

Protective goggles and gloves shield you from debris and sharp edges. Safety should always be a priority.

How can measuring and marking affect my cutting?

Precise measuring and marking ensure accurate cuts. Double-check your measurements and lines to avoid mistakes.

What should I do if my cuts are uneven?

Recheck your measurements and lines. Adjust as needed to achieve better accuracy before proceeding with the cut.

What can cause cracking or splintering during cutting?

Dull blades or rushing the process can lead to poor cuts. Always use a fine-tooth blade and take your time.

What if panels crack despite my best efforts?

If panels crack, use wood filler to fill gaps. Sand the area smooth once it dries to improve appearance.

How does practice impact my cutting skills?

Each cutting experience teaches you something. Reflecting on mistakes helps refine your technique for future cuts.

Why is a straight edge important?

Using a straight edge helps create precise lines for cutting. This can lead to a more professional-looking result.

What should I remember during the cutting process?

Patience is key. Rushing can lead to mistakes that compromise the panel's integrity and overall outcome.

Conclusion

When it comes to learning **how to cut wall panels without cracking**, selecting the right tools is crucial. Start by choosing a sharp utility knife or an appropriate saw designed for the material of the wall panels. Preparation is key: ensure the panels are clean and free of debris to facilitate a smoother cutting process. Proper measurement and marking of your cut lines help guide your cuts accurately, reducing the risk of mistakes.

To execute the cut effectively, employ techniques that minimize pressure and avoid sudden movements, which can lead to cracking or splintering. Keeping the cut steady and at the correct angle is vital. After cutting, it's important to finish the edges for a clean look and clean up the workspace to maintain safety and organization. By following these steps, you can master **how to cut wall panels without cracking**, ensuring a professional finish in your DIY projects.

Henry

Henry

Henry is a dedicated marketing professional with a profound expertise in the company's offerings. With years of experience in the industry, he possesses an impressive understanding of the market dynamics and consumer behaviors that drive success. Henry is committed to sharing his insights through......